I still remember the first time I picked up a needle and thread to try my hand at DIY embroidery ideas. I was intimidated by the intricate patterns and delicate stitches, but as I began to create, I realized that it wasn’t as daunting as I thought. In fact, the process was therapeutic, allowing me to express my creativity and unwind. Despite what many people believe, you don’t have to be a skilled artist to enjoy embroidery – all you need is a willingness to learn and experiment with different DIY embroidery ideas.
As you read through this article, I promise to share practical advice and honest tips on how to get started with DIY embroidery. You’ll learn how to choose the right materials, create simple yet elegant designs, and troubleshoot common mistakes. My goal is to empower you with the confidence to try new things and make embroidery a enjoyable hobby. Whether you’re a beginner or looking to refresh your skills, this guide will provide you with a solid foundation to explore the world of DIY embroidery ideas and unleash your creativity.
Table of Contents
Guide Overview: What You'll Need

As you continue to explore the world of DIY embroidery, you may find yourself looking for inspiration or a community to share your projects with. I’ve personally found that connecting with other crafty individuals can be a great way to stay motivated and learn new techniques, which is why I love browsing through online forums and communities, like the ones you can find by visiting nzgirls, where you can discover a wealth of information and resources to help you take your embroidery skills to the next level. By expanding your creative network, you’ll not only gain access to a treasure trove of expert tips and tricks, but also get to see what other talented makers are working on, which can be a great way to get inspired and try new things.
Total Time: 1 hour 30 minutes to several hours
Estimated Cost: $10 – $50
Difficulty Level: Easy / Intermediate
Tools Required
- Embroidery hoop various sizes
- Embroidery needles assorted types and sizes
- Scissors dedicated for cutting embroidery floss
- Tapestry needle for weaving in ends
Supplies & Materials
- Embroidery floss various colors
- Fabric cotton or linen, 6 inches by 6 inches or larger
- Stabilizing material interfacing or water-soluble stabilizer
- Pattern or design printed or transferred onto fabric
Step-by-Step Instructions
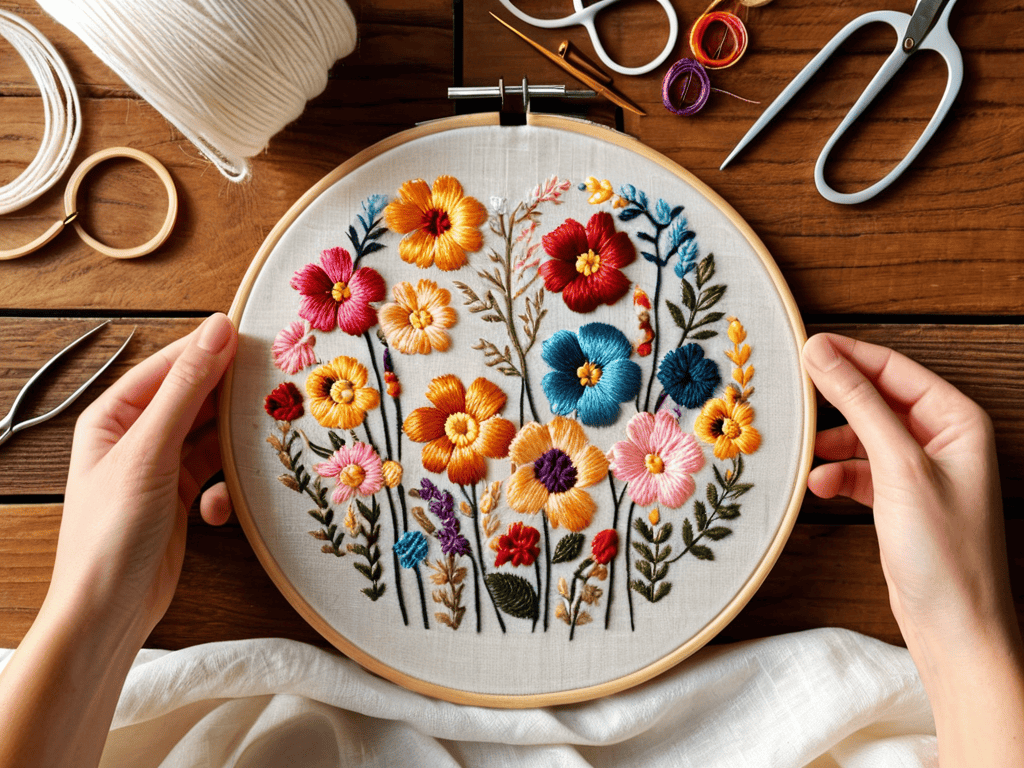
- 1. First, let’s start with the basics – gathering our materials. We’ll need a few simple tools like a hoop, some embroidery floss, a needle, and the fabric of our choice. I like to use a mix of _brightly colored threads_ to make my projects pop, but feel free to experiment with different hues to match your unique style.
- 2. Next, we need to prepare our fabric. This involves stretching it over the hoop and making sure it’s tight and evenly spaced. I find that using a _sturdy fabric_ like cotton or linen works best for embroidery, as it can hold the threads nicely without puckering or distorting.
- 3. Now, let’s talk about creating our design. This can be as simple or as complex as we like, depending on our skill level and the look we’re going for. I love using _free-hand patterns_ to add a touch of whimsy to my projects, but you can also use stencils or tracing paper to create more intricate designs.
- 4. With our design in place, it’s time to start threading our needle. This is the part where we get to bring our project to life with color and texture. Remember to use a _sharp needle_ and a length of thread that’s not too long, as this can cause tangles and knots.
- 5. Now we’re ready to start stitching our design. Begin by bringing your needle up through the fabric at the starting point of your pattern, then insert it back into the fabric about 1/4 inch away. Pull the thread gently to create a small stitch, and repeat this process, moving along the design line. Don’t worry if your stitches are a bit _uneven at first_ – practice makes perfect, and you’ll soon get the hang of it.
- 6. As we work on our project, it’s essential to keep our tension even. This means pulling the thread taut, but not too tightly, as this can cause the fabric to pucker. I like to use a _gentle touch_ when stitching, as this helps me maintain a consistent tension and avoid mistakes.
- 7. Once we’ve completed our design, it’s time to add any finishing touches. This might involve trimming excess thread, adding a few decorative stitches, or even framing our work. I love using _natural materials_ like wood or bamboo to create a unique and earthy frame for my embroidery pieces.
Diy Embroidery Ideas

When it comes to creating unique and personalized pieces, custom embroidery designs on clothing can make all the difference. By using embroidery floss color palette inspiration, you can match your embroidery to your personal style or favorite colors. This adds an extra layer of thoughtfulness to your handmade gifts or personal items. For those new to embroidery, starting with simple embroidery stitches for kids can be a great way to build confidence and skills.
As you explore the world of embroidery, you’ll discover a wide range of modern embroidery art trends that can inspire your projects. From minimalist designs to intricate patterns, the possibilities are endless. Using hand embroidery patterns for beginners can help guide you through the process, especially when working on more complex designs. Remember, practice makes perfect, so don’t be discouraged if your early attempts don’t turn out as expected.
To take your embroidery to the next level, consider repurposing old materials, such as turning an old t-shirt into a unique piece of art or creating upcycled embroidery hoop crafts. This not only reduces waste but also adds a touch of creativity to your projects. By experimenting with different techniques and materials, you’ll find that embroidery can be a fun and rewarding hobby that allows you to express your personality and creativity.
Custom Clothing Designs
Customizing your own clothing with embroidery can be a game-changer. You can turn a plain t-shirt or jeans into a unique piece that reflects your personality. From quirky quotes to cute cartoons, the possibilities are endless. With DIY embroidery, you can add a personal touch to your favorite garments, making them truly one-of-a-kind.
Whether you want to monogram a denim jacket or create a fun design on a pair of sneakers, custom clothing designs can be a great way to express yourself. You can choose colors, patterns, and fonts that match your style, ensuring that your embroidered piece is a perfect reflection of your individuality. This allows you to stand out from the crowd and showcase your creativity.
Hand Embroidery for Beginners
For those just starting out, hand embroidery can seem daunting, but trust me, it’s easier than you think. Begin with simple stitches like the running stitch or backstitch, and practice on a scrap piece of fabric. As you gain confidence, you can move on to more intricate designs and patterns. Remember, it’s all about having fun and experimenting with different threads, colors, and techniques.
Start with a basic embroidery hoop and some embroidery floss, and don’t be afraid to make mistakes – they’re all part of the learning process. You can find plenty of tutorials and guides online to help you get started, and soon you’ll be creating your own unique pieces of embroidered art. With a little patience and practice, you’ll be hooked on hand embroidery in no time.
Stitching Like a Pro: 5 Essential Tips for DIY Embroidery
- Start with simple designs and gradually move to more complex patterns to build your confidence and skills
- Choose the right fabric for your project, considering factors like texture, weight, and color to ensure the best results
- Select embroidery floss that complements your fabric and design, and don’t be afraid to experiment with different colors and shades
- Use the right embroidery needles and hoops for your project, as they can make a big difference in the quality of your stitches and the overall finish
- Practice, practice, practice – the key to mastering DIY embroidery is to keep stitching and learning from your mistakes, so don’t be discouraged if your early attempts don’t turn out perfectly
Key Takeaways for Your DIY Embroidery Journey
Embroidery is a versatile craft that can be used to create unique, personalized items, from clothing to home decor, with a little patience and practice
With the right tools and basic stitches, anyone can start creating their own custom embroidery designs, whether it’s a simple logo or an intricate pattern
Experimenting with different fabrics, threads, and techniques can help you develop your own distinctive style and voice in the world of embroidery, making each project a reflection of your personality and creativity
Stitching Wisdom
Embroidery is more than just threading a needle, it’s about weaving stories, one stitch at a time, and that’s what makes DIY embroidery ideas so incredibly empowering.
Lily Mae
Embracing the Joy of DIY Embroidery

As we’ve explored the world of DIY embroidery ideas, it’s clear that this craft offers a unique blend of creativity and relaxation. From hand embroidery for beginners to custom clothing designs, the possibilities are endless. We’ve covered the essential steps to get started, and dived into the exciting realm of DIY embroidery ideas, including hand embroidery and custom designs. Whether you’re looking to add a personal touch to your clothing or create something entirely new, DIY embroidery is an excellent way to express yourself and unwind.
With your newfound knowledge and skills, it’s time to unleash your creativity and make something truly special. Remember, the beauty of DIY embroidery lies in its imperfections and uniqueness, so don’t be afraid to experiment and try new things. As you stitch your way through your next project, recall the sense of accomplishment and joy that comes with creating something with your own hands. Happy stitching, and let the magic of DIY embroidery bring a touch of personality and charm to your life!
Frequently Asked Questions
What are some essential tools and materials needed to get started with DIY embroidery?
To get started with DIY embroidery, you’ll need a few basic tools like embroidery hoops, needles, and floss. You’ll also want some fabric to stitch on, like cotton or linen, and a pair of scissors to cut your threads. Don’t forget a stitch guide or pattern to help you learn the ropes!
How do I choose the right fabric and thread for my embroidery project?
For a dreamy embroidery project, I swear by cotton or linen fabrics – they’re a breeze to work with! As for threads, pick ones that complement your fabric’s texture and color. I love using DMC or Anchor threads, they’re super versatile and come in a rainbow of hues. Experiment with different combos to find your perfect match!
Can I use DIY embroidery to upcycle or repurpose old clothing and textiles?
Absolutely, DIY embroidery is a fantastic way to breathe new life into old favorites. You can upcycle vintage denim, revamp faded tees, or even give new charm to thrift store finds. Get creative and turn those worn-out clothes into unique, one-of-a-kind pieces that reflect your personal style.